Showing posts with label tutorials

Hello lovelies,


Have you spotted the new hot trend - BRACELET NAILS yet? I did and I want to show you how you can create this nail art yourself using nail polish, string (thread) and embellishments. I love trying out new styles and I think my new nail shapes suits this one a lot!


I've recreated a natural looking bracelet nails by @nail_unistella, a fabulous Korean nail artist! By the way - this same nail artist(s) has also created the shattered glass nails look!


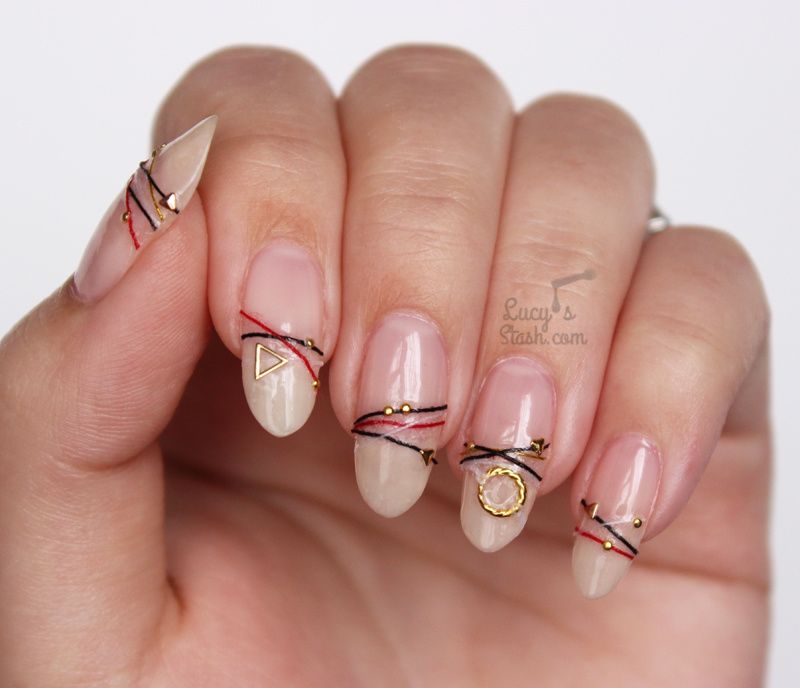
Here's how my nails turned out:


Bracelet Nails DIY Tutorial - How to create your own bracelet nails with nail polish, strings and studs


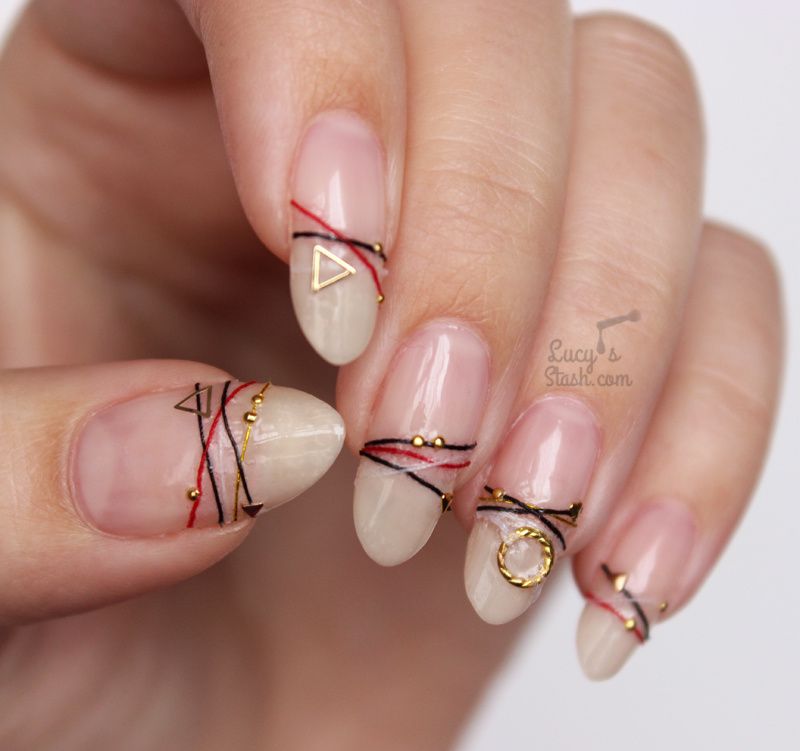
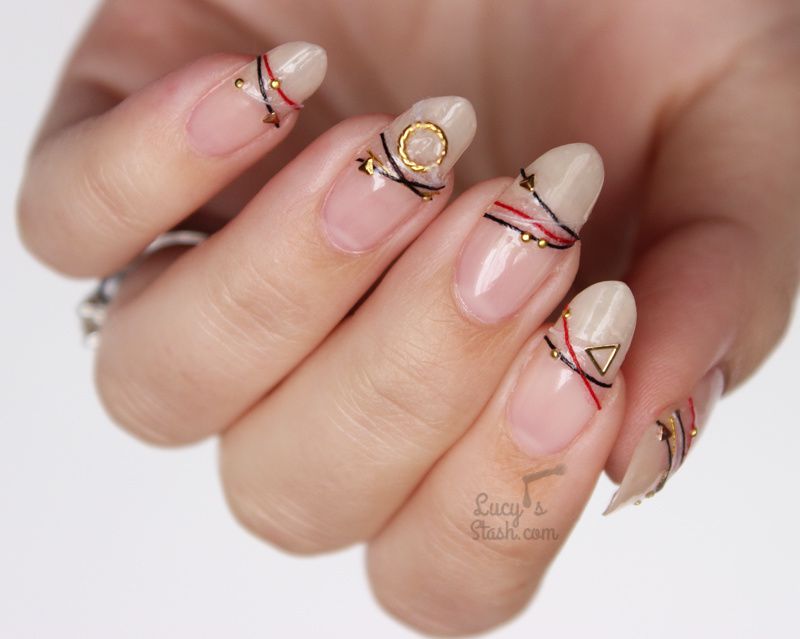
The original bracelet nails are done with sewing threads/strings and embellishments encapsulated in gel. This is certainly the best way to get a long wear out of this design but I know most of you (and I) don't really wear gel nails so I have tested out this trend using nail polish. I'm still wearing these nails 3 days later as I'm writing this post and apart from one small stud everything is still on.


Similar design can also be achieved by painting lines on the nails instead of applying the strings but it just doesn't look as 'real' and authentic to me. It's still pretty and nice alternative though.
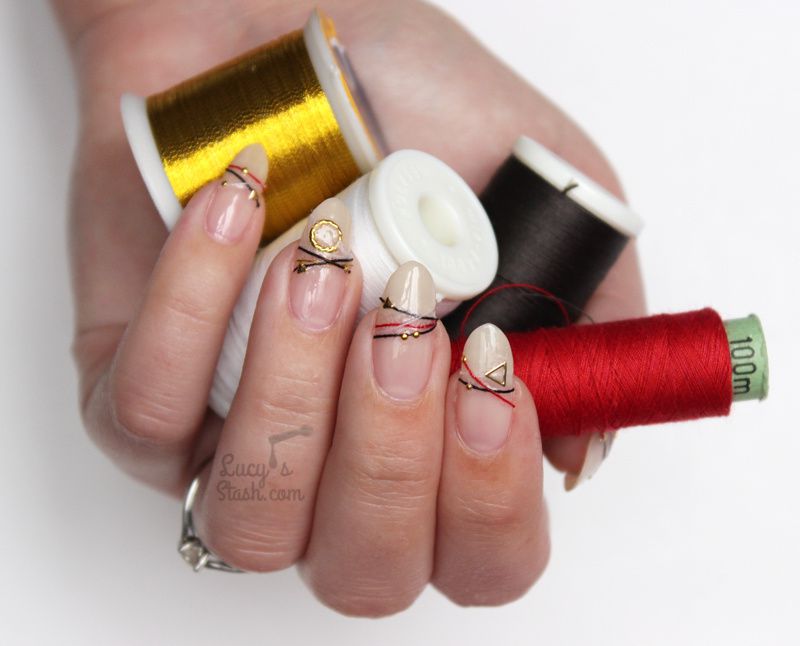
 

Bracelet Nails DIY Tutorial - How to create your own bracelet nails with nail polish, strings and studs


Products used:

Sewing thread/string
Cuticle nippers/scissors
Tweezers
OPI Barre My Soul
Hollow triangle embellishments
Circle wreath stud
Mini triangles
OPI Natural Nail Base Coat
Seche Vite topcoat
Mini dot studs


I've prepared a video tutorial on how to create these nails so I hope you'll find it useful:


TIPS:

  • Choose strings/threads that don't have 'fluf' around them. The strings should be smooth and without fibres sticking out
  • Let the nail polish base dry properly or seal it with fast-drying top coat before adding strings and embellishments. This will prevent the nail polish underneath to be ruined if you have to move the strings and studs around
  • Tweezers will be your best friend - make sure you have a pair handy to be able to handle the string and tiny studs and hold them down while the polish is drying
  • Keep it small and simple - minimalist look seems to suit this style the best as do small studs and embellishments. Big pieces might disrupt the look (yes, I do regret using that big circle piece!)
  • Use two coats of top coat and apply it well around the embellishments to secure them - this will help them to stay on longer


So what do you think of this new trend - will you be trying it? Did you find my tutorial and tips helpful? Let me know what you think in the comments.


Have a lovely day! Lucie x


Hello lovelies,


Today I'd like to share with you a new nail art tuorial and my experience with the Mylee PRO Elite 12W LED Lamp from JustBeauty.co.uk. I've been testing this new lamp for the past few weeks and I'm finally ready to tell you what I think.


About: "The revolutionary light cures gel polish in just 30 seconds using an intelligent memory timer and equal light distribution, so there is no need to keep on adjusting. In fact Mylee Pro Elite does all the hard work for you, the touch sensor cleverly turn the lamp on when your hand is in place so it's ready to go when you are.


Mylee’s compact, lightweight design means that the lamp is ultra-portable and comes complete with grooves for precise, comfortable finger placement."


Nail Art Tutorial + Mylee PRO Elite LED Lamp Review


My very first thoughts when I opened the box with the lamp in it was how tiny it is! This lamp is very small and lightweight compared to my Nsi UV lamp that is 3x the size. I like that it makes it great for travelling either for long holiday or if you are a mobile nail technician.


The lamp cam in two boxes - first one was the outer packaging for shipping and then the box with lamp itself. The box is branded with a picture of the lamp and a brief description of it and of the main features; some of them are:

  • 30 second curing cycle
  • touch sensor
  • equal light distribution
  • 2 year warranty
  • 50,000 hour life span
  • 4 + 1 – comfortably fits 4 fingers in the precise grooves


This lamp has a discreet logo at the back and no button or additional settings. I just plugged it into the power outlet and that's it. It operates on touch sensor so once I put my hand in it automatically started a pre-set 30 second cycle. If hand is removed before the 30 seconds are finished, the lamp switches itself off. At first, I wasn't sure I like this feature because I like to move and turn my hand in the lamp to get to cure every spot on my nails (this is not necessary to do) and I accidentally switched the lamp off because I lifted my hand too much. But after few uses I've gotten used to it and now it's very convenient that I don't have to press any button to turn the lamp on or off.


As mentioned above, the lamp is very compact and it can fit up to 4 nails at a time. Some professionals already do 4 nails at a time and then do the thumbs last because the product on thumbs can flood the skin if the whole hand is done at once. This is definitely a case of preference.


Nail Art Tutorial + Mylee PRO Elite LED Lamp Review


I've tested the lamp on different brands of gel polish including Color Club, Gelish and IBD and all seemed to be cured well. I've also tested it with Color Club gel polish on myself and it also worked well without any problems.


Overall, I'm happy to recommend this little lamp. It worked well for me, it's very compact and lightweight and simple to operate.


Mylee PRO Elite 12W LED Lamp is priced at £29.99 - making it very affordable especially for home users. PLUS I have an exclusive discount code for you to use! Use code JustLucy20 for 20% off!


Nail Art Tutorial + Mylee PRO Elite LED Lamp Review


And now I have for you new gel polish tutorial that I've prepared using this Mylee LED lamp and IBD gel polishes from JustBeauty.co.uk. I've called it Crack into a Rainbow Universe :)


What do you think of the nail art design and the cute little Mylee lamp? Would you consider it for yourself to use at home? Let me know in the comments ;)


Have a lovely day! Lucie

*PR sample